

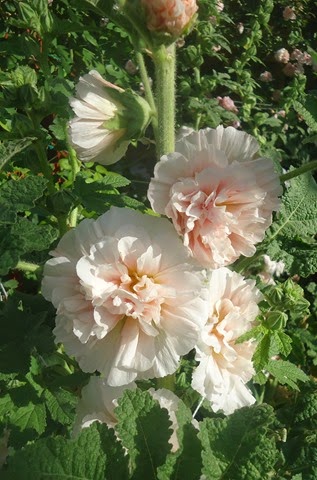
With spring already firmly established and seed planting and sowing already started, I thought this would be the perfect time to extol the virtues of the Hollyhock. Hollyhocks were a typical plant that could be found growing in most any Victorian-era garden. Whether you're planning a formal garden reminiscent of the Victorian age, an old-fashioned cottage garden, or something entirely different, I suggest you consider planting some Hollyhocks. Hollyhocks have many positive attributes including:

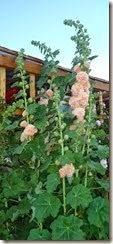
- Hollyhocks add a beautiful splash of color and vertical dimension to any bord
- Spectacular showy blooms
- Hollyhocks ability to readily reseed themselves allow them to perform like a perennial
- They are able to tolerate heat well.
- If you have a hot sunny spot other plants can't tolerate, try planting some Hollyhocks.
- Hollyhocks are a favorite of the Hummingbird
- The Hollyhocks height makes it an excellent screen for fences and other unsightly garden features
- For the most spectacular blooms, you plant your Hollyhocks in full sun. They will tolerate a slight amount of shade, Hollyhocks growing in dappled sunlight may not grow as tall, however, the blooms often last a little longer.
- Hollyhocks will not thrive in heavy compacted soil. They grow their best in the soil which is rich and well drained.

The Best Location To Plant Your Hollyhocks
There are two things to consider when choosing a location to plant your Hollyhocks:


When To Plant Hollyhocks
When Planting Hollyhocks From Seed
The most common recommendation is to plant your Hollyhock seeds in the fall, this allows the root system to get established over the winter months. Hollyhocks planted in the fall have a chance of blooming following summer.If you are unable to get your seeds sown in the fall to have no fear Hollyhock seeds can be planted spring too. In the spring plant your seeds as soon as you can work up the soil. When planted in the spring Hollyhocks will produce foliage, but will not bloom until the following summer.

When Planting Hollyhock Seedlings
Hollyhock seedlings should be planted in the spring after the last frost. If you start your own seedlings,
they should be gradually acclimated to their new surroundings over the course of 10 to 15 days.
they should be gradually acclimated to their new surroundings over the course of 10 to 15 days.
- Prepare the bed for planting, by working it up thoroughly.
- Add a healthy amount of compost, because Hollyhocks love their soil rich.
- Spread the seeds over the surface of the planting bed.
- Cover lightly with soil, no more than 1/4 of an inch. (If Hollyhock seeds are planted too deeply they will not germinate.)
- Water thoroughly.
- Hollyhocks need plenty of water to bloom well, but not too much. I water mine twice a week during the summer months. Always water at the base of the plant. Keeping your plants well watered and watering at the base helps to prevent rust.
- If your Hollyhocks are located in a windy area, or you find that they are leaning due to their size, use stakes to help support them.
- Deadheading your Hollyhocks will prolong blooming. Deadheading is simply removing faded flowers before they have a chance to form seed pods.
- Frequently checking your plants during the growing season, will allow you to quickly remove any infected foliage at the first sign a rust infection. This should help slow any further spread of the fungus.
- Keeping water off the foliage when watering and good air flow around the plants also helps to prevent rust.
- Keep your beds weeded to eliminate other common hosts of rust like Round Leaved Mallow.
How To Plant Hollyhock Seeds
Plant Hollyhock Seed Spring or Fall As Follows:

Planting Hollyhocks In The Spring
Planting Hollyhocks In The Fall
Trim back any foliage at first frost. Mulch well, especially if you live in an area with severe winters. Remove the mulch in the spring and thin as described above.
Hollyhock Care And Maintenance
In the spring you can top dress your Hollyhock bed with composted manure or any other rich compost. This will promote rigorous growth.
In the late fall cut back all of that seasons foliage. Apply some bone meal to give the root system a boost over the winter and mulch well
Hollyhock Rust is caused by a fungus called Puccinia malvacearum. The symptoms of Hollyhock Rust first present as rusty orange spot on the underside of the leaves. As the fungus progresses you will begin to see brighter orange spots on the tops of the leaves. Eventually the spot will grow and turn a dark brown color. Left untreated Rust may cause the loss of foliage.

Preventing And Treating Hollyhock Rust
Here Are 5 Easy Tips To Prevent And Treat Hollyhock Rust:At the end of the growing season always remove and dispose of any infected plants and plant materials. This will help limit the number of rust spores that survive the winter. Do Not put infected plants into your compost pile. Infected material should be burned, or sealed in a plastic bag and taken to the landfill.
No comments:
Post a Comment
Please leave a comment or ask a gardening question.